
I drilled the center of mine out with a drill and bought new ones. My game didn't have a free play switch, but the on off toggle switch is under the unit where the power transformer is.


I drilled the center of mine out with a drill and bought new ones. My game didn't have a free play switch, but the on off toggle switch is under the unit where the power transformer is.

Makeshift CRT Discharger
When you used this..Did you get a pop,spark or anything..?
I made one just like it when I pulled the Monitor on my cab to move it..I didn't get anything after trying several times.
I had the cab on days before but it seems the charge drained..
I was Scared to death to get a shock,thinking I did something wrong....I never touched the red wire though I did pull the wire out from the tube..Not sure if I'd get a shock from the boot.

It was a tiny little spark, that didn't sound any worse than a static electricity snap. I was actually pretty scared myself, after seeing tons of comments online about how dangerous it was and how you really shouldn't even attempt it. I fact, the cab had only been unplugged for about 25 minutes when I did it.Originally Posted by Videogamerdaryll

I was only able to get a very small spark once in the 1st day. I tried it several times within the 1st hour after unplugging the suction cup, and still nothing. Then the next day, almost 24 hours after I took off the suction cup, I got a small electric shock when I touched the tube near the hole. Go figure. But it was a fairly small shock, that didn't hurt.
I would assume it can be a lot more dangerous depending on the monitor, but my experience was really uneventful.
Last edited by TheDomesticInstitution; 05-19-2009 at 09:33 PM.

The Internet has greatly exaggerated the dangers associated with discharging a tube. Even after discharging the tube and removing the suction cup, you'll want to stick the screwdriver around the edge of the hole as well. The tube essentially acts like one big capacitor and can still have charge left in it, which is probably what gave you the shock when you touched near the hole.

Hey, if you didn't die it'll NEVER be dangerous, right? :P
Better safe than sorry - don't fuck with electricity.
<Sothy> its the internet <Sothy> who cares

Well today was the day. I got the cap kit today and dove in once the mail came.
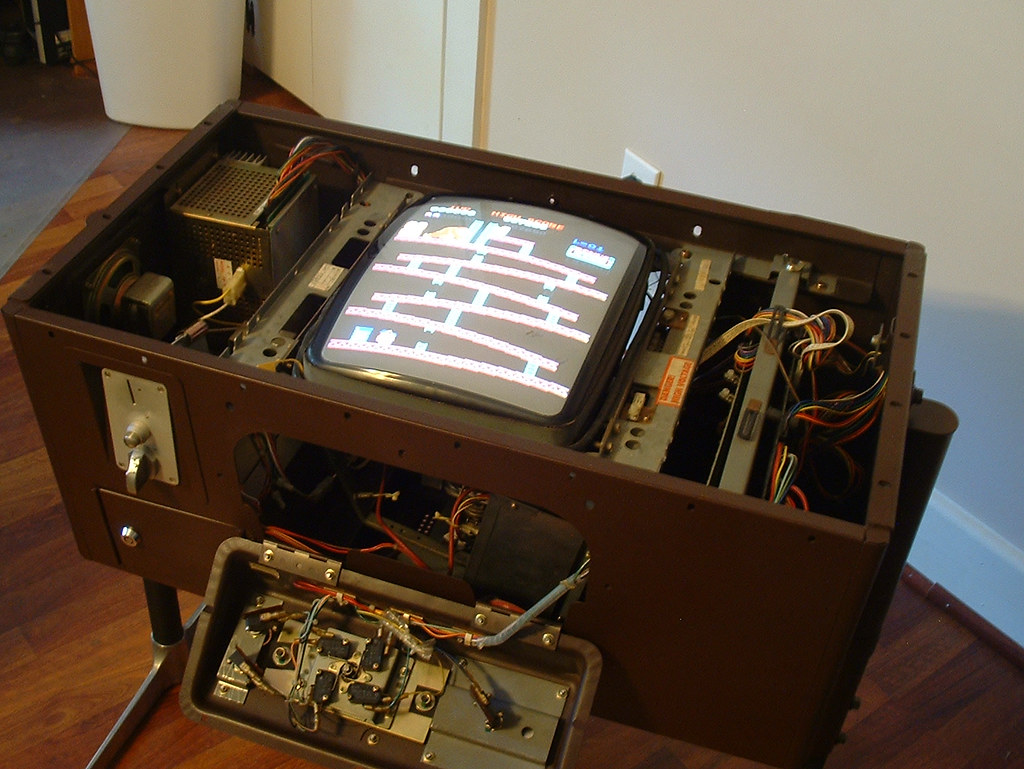
I must preface this by saying that I only really tried soldering for the 1st time last night. While I was out yesterday I found a scrap circuit board with some capacitors on it, so I bought it for a quarter. I got home and was trying to figure out how to remove solder, as I seemed to be making a mess while doing it. Well it's a good thing I decided to check out a few videos last night, because I didn't know about a very important tool... the solder remover. Well I picked one up at Radio Shack today and when I got home I did a few more practice runs on the scrap board (seen in photo) before trying the real thing.
Anyway as the pictures attest, I did it right! I can barely believe it. Especially considering that I did it with the monitor still attached to the PCB. It took me almost 4 hours, but now I have a full image.
So I have a few more things I'd like to do, but I am in no hurry to them right now. On the list:
-New OEM Coin Selector (this one may take a while, because they're really hard to find)
-High Score save kit
-New locks
-replacement joystick for P2
That should do it then. I've taken care of the biggest things, so I consider these other things just minor upgrades.
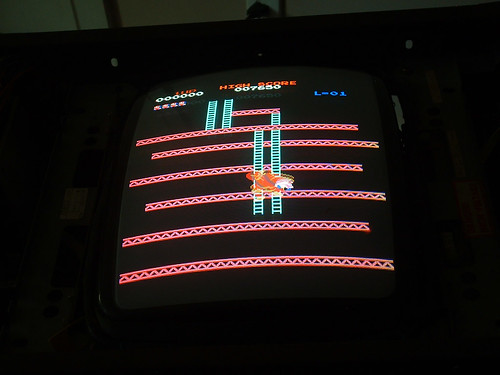
Although I am having another issue that I notice before I actually took the thing apart. While it doesn't hurt gameplay any, right now it does seem just ever so slightly prominent. When I play, I notice that some of the image crawls a little. Not enough to where it shifts positions, but almost like some video noise. It' will only do this on color parts and it doesn't ever bleed into the black areas of the screen? Anyone have any thoughts on this? Is it more likely the Sanyo monitor or an issue with the board.
Also I think I may need to demagnetize the screen too, as it appears discolored sometimes, whereas it didn't before taking it apart. Although it seems to go away after it warms up a bit... weird.
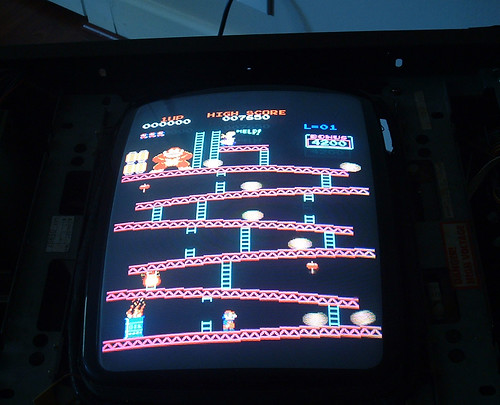
At any rate, here are a few more pics with it's fresh new paint and a newly refurbished monitor. Thanks for the kind words everyone, and hope this inspires another noob to try it that may haven't had the confidence before. Check the previous page for "before" shots of the screen
If I didn't fuck the thing up, you probably won't either.
Excellent work! The monitor is actually in *really* nice condition. No focus problems at all nor any burn in that I can notice in those pictures. I wonder if it lived most of its life in a home rather than on location.
Yeah, on this board though a lot of the solders were really close together. And I actually didn't take apart the monitor much, so I couldn't really hold the board in my hand. If you look at the picture on the 1st page of the monitor sitting in the blanket, well that's how it was soldered. I was often placing caps in with a needle-nose pliers, and having to solder on surfaces that were not exactly flat.
Well it doesn't happen all of the time, usually after it's been on a while. As far as showing you what I mean, its seems like I'd have to post a video of it because it's not something that can really be shown in stills. And it's more like the pixels shift ever so slightly and then move back into place. It's usually when there's other movement going on around it. As it stands now, it's not a big deal and I usually don't leave it on for hours anyway. This problem may have happened for years, but I don't have any way of knowing. Let's hope it stays a minor thing for the time being."Noise" in the picture usually ends up coming from the game board, but it's hard to see exactly what you mean from your pics. Easiest way to isolate it would be to either try another monitor, or try your boardset in another cab.
Unfortunately, this is the only cab I have, and know of no arcade repair places near at all. So swapping it out, probably isn't going to happen.
I'm pretty sure it's a board issue too, and not a monitor glitch. Anyway since I have the 4 board version and it's pretty cramped in there, I'm going to leave it be for the time being (unless it were to become unplayable).
This issue completely vanished by the next day. All the colors appear normal now, maybe the monitor needed a "break-in" period after it being flipped about for several days.I don't think Nintendo hooked up a demag button in their tables. If not, you'll need a degausser or a soldering gun, or a really good magnet.
Anyway I'm still really happy with the work, and I feel very accomplished knowing that I repaired it myself.
Last edited by TheDomesticInstitution; 05-22-2009 at 05:55 PM.
Here is the closet coin mech I could find it is made by the same company. And for 18.99 it might be able to be used for parts.
http://thearcadeboneyard.com/files/N...op_800x600.jpg
Thanks for the tip. I contacted him over the weekend, and he quoted me $28 shipped on the coin mech. I thought about it and decided not to get it right now. I could have definitely made a working one from that one, but I would also like one with a faceplate that isn't so scratched up. At almost $29 shipped, it was a little too much to pull the trigger considering the cosmetic condition of the exterior. Had he quoted me $22 or less shipped I would have done it. Being that funds are a little tight right now, it would have to be in excellent condition for me to pay $30. I'm checking ebay every day though, and have my eyes peeled for one.
Why not bump a thread. I finally got DK2 and wanted to share it with those who may not know about it. Also since I last updated this post, I've done the following:
-Replaced the non-working coin mech with a working one.
-Replaced the P2 joystick with an original one.
-Replaced the missing coin tray.
-Recapped all the boards and power supply
-Tried to fix a video glitch unsuccessfully. After talking with other owners it seems to be a board problem
-Added a new lock to the coin door.
-Removed the Z80 CPU and put a socketed version in it's place, for DKII kit
-As of yesterday installed the Donkey Kong 2/High Score save kit.
For anyone unfamiliar with Donkey Kong 2, it's a sequel to the first Donkey Kong with many all new levels. You can either get a chip upgrade for your Dedicated Donkey Kong machine or buy a multi game board that also has it. I, of course, bought the chip and added it to my board. Here's info on the game with screen shots.
http://www.arcadeshop.com/konghs_dk2/kongmultikit.htm
Now not only does my machine have to seperate games on it, but Donkey Kong now remembers your high scores and initials when you turn it off. I don't know why I'm writing this for people unfamiliar with it, since most who hang out in this forum probably already know most of it... but just in case someone accidently clicks on the link who may not...
So the kit cost $79, and it's pretty awesome. The challenge to adding this kit to my machine was that I have an early board set, where the CPU wasn't socketed to the board. So I had to remove the original chip, and replace it with a socket and brand new CPU. Here is the process I had to go through.
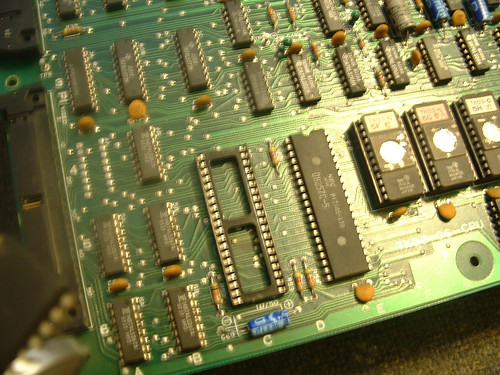
Here's where the z80 chip is located.
Here's a closer view.
Here is the empty space where the CPU used to be.
It's nearly impossible to remove a chip with this many legs and reuse it. I cut the legs and saved a lot of time.
Here is the socket that is key to adding the multi kit. If you're z80 isn't socketed you won't be able to add the kit.
Here is the socket now attached to the board.
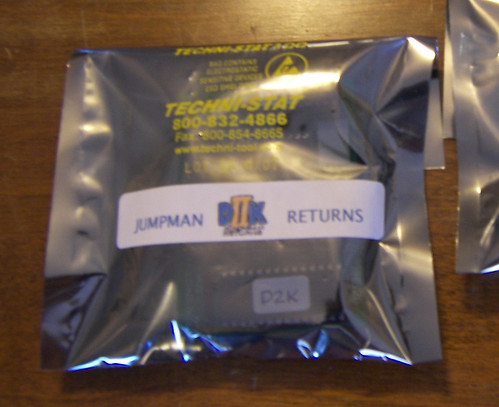
Here is the kit.
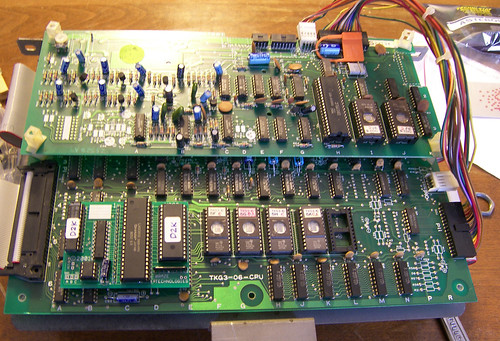
Here it is on the PCB set, ready to go back into the machine.
Anyway I figured this may be useful to 1 or 2 people if they ever stumble across this thread. And also I just figured I'd also update what I've done, to the machine since then. The machine works great still, and now there's quite a bit more replay value. The one downside to this DK2 mod, is tha it took away the ladder cheat, which comes in handy on the Girder stage. Most Donkey Kong machines don't allow you to do this cheat anyway, except the really early machines where the ROMS weren't updated.
My cabinet of similar vintage has a degauss button inside... have you done a complete search of the cab?
<Sothy> its the internet <Sothy> who cares
No degauss button inside. It has a degaussing coil that works all the time though. I only get discoloration when I move the monitor, but it always corrects itself after a few hours or a day.
Also something I thought I'd mention - I got a Konami > Jamma converter and put a 48-in-1 board in mine. I haven't looked at the board type for DK but it is a neat option for those cabinets!
This was mine: http://www.digitpress.com/forum/showthread.php?t=97249
I like yours better - the white top is nice!
Last edited by skaar; 03-20-2010 at 12:10 PM.
<Sothy> its the internet <Sothy> who cares
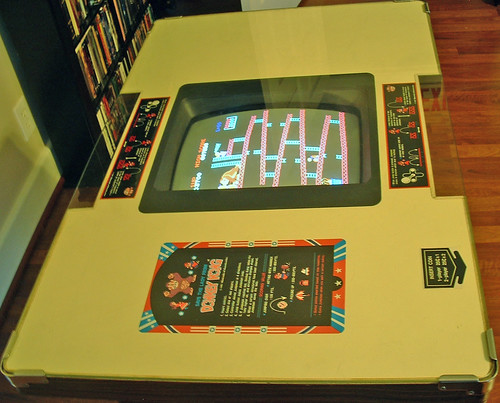
Cool cabinet. Did you do anything to it since then? Do you still have it? And my final question, do you still play it?
I don't need to multi my DK- that's what this is for.
My restoration/conversion of this, can be found in the link below.
http://forums.arcade-museum.com/showthread.php?t=106918
Repainted by hand without stencils. It has a 60-in-1 in it and I love it. Spent way too much time on this guy, so I can never sell it.
Last edited by TheDomesticInstitution; 03-20-2010 at 12:23 PM.

Need some official DK2 cocktail artwork?
http://www.thisoldgame.com/products/...il-art-package
Rich does good work at this old game. My multi Pac (above) custom CPO was printed by him and it's great work. I don't know if I want the custom artwork because I like my original artwork fine. If they made a single card to put under the backglass, I'd buy it, but my artwork is in such good (original) condition, that I don't see a need.

I would have gotten a $12 de-soldering iron from RadioShack so I could always replace the Z80, but it's still a cool thing.
You can switch between I and II, right?
As long as you set in on "freeplay" you can hit the p1 and p2 button for 2 seconds and it'll give you the choice to go to the other one.
 Posting Permissions

 Reply With Quote