
|
Atari 400/800/XL/XE/XEGS systems |
· EASTER EGG: According to some Analog magazines, there are several Easter eggs (a message, a game, and a couple of demos) which can be accessed by shorting certain joystick pins together. Approximately 80k carts were made before Atari found out about it and had them removed. Supposedly Atari sued Robinson over this one but the lawsuit was settled out of court. The cartridges with the Easter eggs were rumored to have been recalled, but thousands had already been sold by that time.
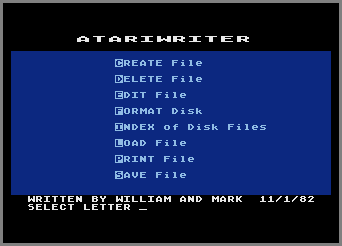
· EASTER EGG: In prototype version Rev# 3, “WRITTEN BY WILLIAM AND MARK 11/1/82” (for programmer William Robinson) will appear if you press UP+LEFT+DOWN at the same time on joystick #1 at the main menu (picture #1). Prototype Rev #7 had this message removed but the code to trigger it still remains. {Frantisek Houra}
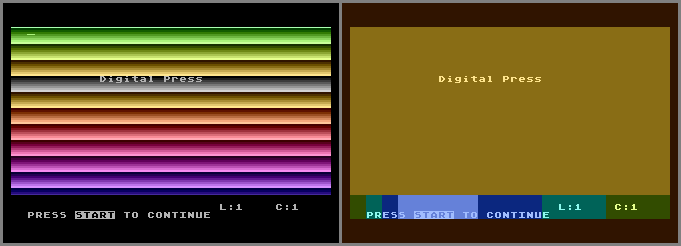
· EASTER EGG: At least 2 prototype versions, Rev #3 and Rev #7, have a hidden color “rainbow” effect (picture #2). To trigger it, you must be in preview mode. Select Edit from the main menu, type something, press OPTION+P to enable print mode, pick any printer, and then select preview whole document. From there, on joystick #1 press UP+LEFT+DOWN at the same time. With Rev #3, you have to trigger the other color demo in order to turn the effect “off”. {Frantisek Houra}
· EASTER EGG: At least 2 prototype versions, Rev #3 and Rev #7, have a hidden color + sound effect (picture #3). To trigger it, you must be in preview mode. Select Edit from the main menu, type something, press OPTION+P to enable print mode, pick any printer, and then select preview whole document. From there, on joystick #2 press UP+LEFT+DOWN at the same time. With Rev #3, you have to trigger the other color effect in order to trigger this one again. {Frantisek Houra}
· A prototype version, Rev# 16, has support for 80-column printers and supports the 1025, 825, 1020, and 1027 printers. The release version supports the 1025, 825, 820, and 822 printers, as do prototype versions Rev #3 and #7.
· 3 different versions exist. The most common version (version A) was released with the then-standard brown label in 1982 for the Atari 400/800 systems. The second version (version B) is much less common and has a strange silver label with red text. This version was released in 1983, and fixes an incompatibility that AtariWriter had with newer Atari systems (mainly the XL/XE line). Revision C was released in 1988 and removes the Easter egg from the earlier version as well. AtariWriter was also released in several foreign countries, each in a different language (such as AtariTexte in France, and Atari Schreiber in Germany).
· Undocumented feature – Mail Merge: It’s possible to do a mail-merge. What you do is create a text file with the information you want merged into your document. You then create your letter, with the insert text command where you want information from the text file inserted. Then when you print the letter, and it asks you to enter the text, you hit CONTROL-V, and then type the pathname of the text file. It will then add the information from the text file. {Ryan Collins}
· Undocumented feature – File Transfer: If you have an old Atari 830 modem and TeleLink cartridge you can use AtariWriter to upload and download! This method may also work with other modems, as is or with modifications, but the only hardware compatibility I can personally vouch for is the 830 with TeleLink. In this example, let's say I am going to send you a file and you are going to receive it through your 830. We will both need to do some preliminary setting up. First we turn on our 850 interface modules, disk drives and 830 modems. Set the 830 modem to half duplex. If you have your original Master Disk with the AUTORUN.SYS file on it, you can insert that into your disk drive. If you do not have AUTORUN.SYS, see the suggestions in this issue's I/O Board section. After you have placed your AtariWriter cartridge in your computer, turn the volume on your monitor up and turn on your computer. The drive will begin whirring and you should hear beeps coming out of the monitor. If the initial title screen is red, it means that DOS is not on the disk that was inserted the drive. If the title screen is blue; it means that DOS is loading properly. As soon as we have each other on the telephone, I will load my transmission file into my computer. I simply select LOAD FILE from the main menu enter a D: FILENAME after the prompt and hit [RETURN]. You will need to select CREATE FILE from your main menu screen. The CREATE FILE command will take you to the typing area of AtariWriter. To exit, you must press the [ESCI key. You will also have to select LOAD FILE from the main menu. After the prompt you should type in R1: and then switch your modem to ANSWER mode. Place your phone in the handset and press [RETURN]. Next I will select SAVE from the menu, type in R1: and push [RETURN]. If things are working, I will hear a buzzing noise that tells me your modem is placed in the hand set. Do not worry if you don't hear the sound, sometimes it's hard to hear. Now I'll switch my modem to ORIGINATE mode and place my phone in the handset. When I press [RETURN], I will hear a beeping noise coming out of my monitor, which means data is being transmitted successfully. When your screen prompts you with SELECT LETTER, type [E] to edit the document. This will show you the document in the typing area. If you just want to save it to disk, press the [ESC] key and select SAVE from the main menu. Type in D1: FILENAME at the prompt. If you find that it doesn't work the first time, try again and go through the steps a little more slowly.
· Undocumented feature - 825 BOLD PRINTING: Some commands can be used to do more than they were intended for. The superscript command causes the printer to back up half a line and print. If two of these commands are used together, the printer backs up one whole line-the same line it just finished printing. So if you type in the same words before and after the two superscript commands, you can get the letters printed over twice. Instant boldface on your Atari 825 printer!
· Undocumented feature - 1025 ELONGATIONS: To print elongated characters with the 1025 printer you need to set [CONTROL][G] to [3]. To turn off the elongated characters type in [CONTROL][G] followed by a [1] for 10 characters per inch (cpi), or a [2] for 16.7 cpi. The usual [SELECT] [E] command will not create elongated printing on the 1025.
· Undocumented feature - TIPS FOR THE 1025 AND 1027: To print with single sheets of letter paper on your Atari 1025 or 1027, insert the [CONTROL][W] page wait command at the beginning of the document under the print formatting line. The printer will pause at the end of each page, and you can insert a new sheet of paper. Press [RETURN] when you're ready to start the next page. NOTE: For the 1025, first tape down the Paper Out switch on top of the printer towards the upper left. International characters can be accessed on the 1025 and 1027 by inserting a [CONTROL][O] (capital letter) [27] followed by [CONTROL][O][23]. This activates the international character mode. As each character is needed, you have to use the [CONTROL] [O] and the decimal code for that letter. These codes are listed in your printer manual.
· Undocumented feature - 1027 MYSTERIES: The 1027 has an unusual quirk. It sometimes stops printing for no apparent reason. Try not to worry when your printer falls asleep on you. Just leave it alone and it will recover in about 4 1/2 minutes. When it awakes, it will begin printing right where it left off. Also, the 1027 does not underline when inverse video is used. Select printer number one from the main menu and insert [CONTROL][O] (capital letter) [15] where you want the underline to begin and a [CONTROL] [O][14] where you want the underline to end. If your margins have been brought in closer than the default values, the underline starts from the far-left of the paper. The easiest solution is to adjust the margins. If this is not possible, you can turn off the underlining after the last word on the line, and turn it back on for the first word on the following line. Never use labels in your Atari 1027 printer. They can easily peel off their backing and stick to the delicate inner workings of the printer. When the 1027 gets repaired, the entire print head mechanism is removed and replaced. It can be costly. Instead, you can use your 1027 to make a label template on plain paper, but reproduce the finished labels on a photocopier, using special peel-off sheets that work with most copying machines.
· AtariWriter is actually a rewrite of an older program called Text Wizard, a word processor originally published by Datasoft.

