Collectors need that "happy place" to store, display, and enjoy their goodies, right? Join our architect of gaming for a session in improving your room's functionality and look.
Marquee AttractionsWelcome to Invading Spaces, ladies and gents. In this column, we won't so much be trading spaces as taking them over and turning them into no-fly zones for reality. I'm going to assume you've already gotten your actual collecting out of the way, and now you need to build the perfect place to play and display. I'm also going to assume you're on a budget - the room where I'll be demonstrating these techniques is in my own newly-bought home, so I'm most certainly on a budget. I just try to keep it from looking like that - from the front.
Take a good look at a classic arcade marquee and you may notice subtleties you didn't pick up on as a kid. They're works of art. One version of the marquee for Stern's Bagman, for example, is a mini-comic-strip which actually contains fairly detailed instructions and a bit of strategy for the game. Midway's Discs Of Tron is breathtaking, with its marquee's lenticular motion - the background seems to move as your viewing angle changes. Others are just remarkable pieces of pop culture - Pac-Man, Defender, Zaxxon, Tron, Asteroids...many marquees have a stark simplicity and an all-important mission: to make you want to drop a quarter in that machine. Sadly, side art was often obscured by neighboring machines or walls. When the arcade boom went "BOOM" - in those fleeting months before it went bust - operators logically chose to pack more machines into their arcades rather than allowing them to take up inordinate amounts of space so gamers could admire the side art. This left the marquees with the job of "selling" the game to the people with quarters in their pockets. Somewhere early in my eBay bidding career, I became enamoured of the idea of owning a piece of an arcade game. This is the kind of fixation one develops when one is young and has disposable income, but no dispoosable space for an entire machine - and this is how one can get sucked into the world of collecting arcade marquees. I snatched a few of these puppies up, and then...leaned them up against the wall on top of my media shelves. But not only were they at a 90-degree angle from how they were meant to be seen, they weren't backlit. It's the nature of this particular beast to be lit from behind - space games, especially, took full advantage of screen printing processes to have a logo literally jumping out of a field of blackness. Having a marquee on the wall is nice, but sometimes it's impossible to do a marquee justice without light. Later on, I took my first swing at backlighting everything, but still mostly in a leaned-up-against-the-wall way, until I discovered this reasonably economical way of doing things - and the material needed is readily available, though it's probably not even remotely connected with video games in your mind.
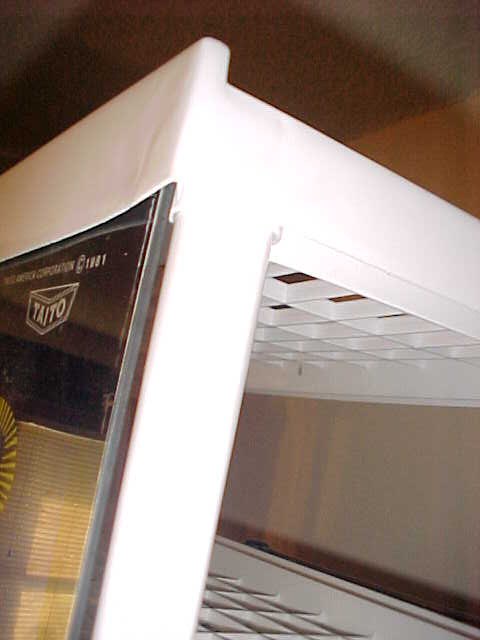
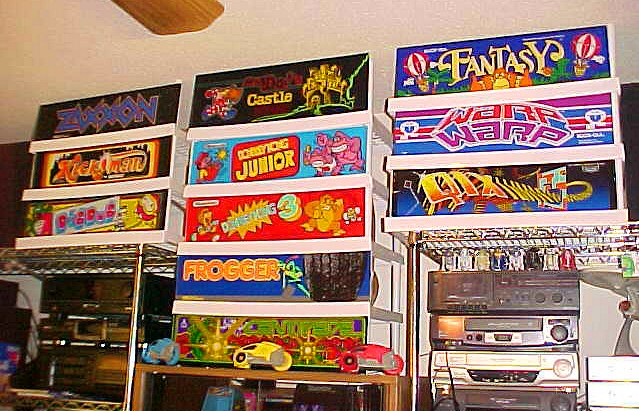
First off, a little caveat: this project does involve electrical products, so the usual concerns about wiring safety apply. Heat buildup is also a concern, though the way this display is put together addresses that concern quite neatly, without compromising the look of the display. I have had no problems with heat being dissipated, but the displays you'll see in the example photos below are free-standing. I don't recommend trying to pull this display off inside a shelf or other enclosed, poorly-ventilated space. First off, obviously, you'll need a few of those coveted slabs of plexiglas (though many marquees, especially for earlier games, are made of glass as well). You will also need clear white rope lights - readily available from Wal-Mart, Home Depot or any number of other outlets - and several open-grated plastic shoe shelves, again readily (and very inexpensively) available. The way these shelves are constructed, there's a recessed area molded into the hollow bottom of the shelves. This "lip" is intended to keep anything on top of those shelves from being pushed off the back of said shelves, but it's also dandy for holding a marquee in place. Next, pick a spot - atop an entertainment center or a bookcase is good - where you think a stack of arcade memories would look good. I recommend keeping the stack somewhat short - if you can call this short - somewhere in the neighborhood of 3-4 marquees only. The way you'll be putting these together is going to be a little front-heavy by definition, and without anchoring the entire setup to a wall, a stack that's too tall will be prone to toppling over forward. This isn't going to be a floor-to-ceiling display. It's also not even necessarily a permanent one, making it reasonably easy to change out marquees on a whim. Starting with the bottom shelf, pick a marquee tall enough that the recessed area of the shelf envelops it snugly; technically, your shelves will be backward. The shelf should still be standing on all four legs, even with the marquee in place. It's important to make sure that this bottom shelf is especially solid. Even though this display isn't too delicate a balancing act, the weight and stability of everything above it depends on the bottom shelf. Don't pick a marquee so tall that it will leave the shelf standing on only two legs. Next, assemble the other shelves that will make up part of the display and stack them on top of this bottom shelf. The empty stack should be pretty solidly standing on its own weight at this point. Before inserting marquees into each shelf, take this opportunity to either string a light rope through the grating of the shelves, or to position fluorescent tubes in each shelf if you don't want to mess with the light ropes. Either is a valid option; light ropes will give you a softer glow that may fit in with your decorating plans more, though fluorescent tubes are generally more representative of the kind of light source that was really behind most marquees in the arcade. If stringing light ropes, try to create a simple M or W shape through the shelf stack; it will help hold the shelves together and will keep the lights from succumbing to gravity too much. Will the light ropes heat up enough to damage the plastic shelves? Not as well-ventilated as they'll be: remember that the marquees are taking up only a sliver of space in each shelf - the entire remaining volume of each shelf is open for circulation. It's important, when using light ropes, not to make too much of a pretzel within the shelf stack. Even light ropes burn out eventually, and the resulting mess as you try to change the light rope out is something I'd describe as the Ssssnake effect - just as easy and fun as the Data Age classic. Which is to say, neither easy nor fun at all. Now gently insert each marquee into each shelf as before, starting from the bottom. Again, don't pick a marquee so tall that it leaves its shelf doing a wheelie. I've found that these shelves accomodate most marquees, though the very widest Williams marquees (i.e. Defender, Robotron) and the very tallest Midway marquees (i.e. Pac-Man, Galaga, Tron) may not fit. The handier gamers out there may find a way around the height issue by finding or making a wooden rod that would effectively extend the height of the shelf legs by fitting snugly into the openings in the shelves themselves while also providing a "ledge" to stabilize the bottom of each leg for the shelf above it. Another tip vital for stability: keep glass marquees on the bottom of the display. They're almost always heavier than plexiglas. Repeat this last step until your display stack is full of classic arcade goodness. Make sure it's stable - you don't have to give it an almighty push, but hold it carefully and see if it shows any signs of rocking back and forth. If it rocks too easily, go back and check each shelf to make sure none of the marquees are too tall for the space they're in. Bookshelves and entertainment centers do get bumped into in the course of daily use - make sure your display's not too delicate to withstand the occasional light impact. If all is well, the combined weight of the marquees in front and the lighting in back should anchor the display nicely. Oh, and it should look really cool when you plug it in. Bonus RoundIn the course of this column's run, it's my intention to get you, the readers, involved - after all, I'm sure I'm not the only one who's decorating his gamespace on the cheap. If you've found a cheap but impressive way to get around that gaping hole in your life left by the lack of an official backlit Sony glass-doored store display, let me know - I'll be more than happy to include the best ideas here. For starters though, I'm going to throw out an example of a relatively inexpensive and completely kooky idea that wouldn't merit its own column. To aid in my countdown to the next Classic Gaming Expo (oh, admit it, you're counting down the days too), I wanted a wall calendar that would somehow reflect my retrogaming passion. And before you go pointing out to me that there's already a program called Print Shop that could help out here, I wanted to do it in such a way that, in itself, the calendar could somehow be interactive. Enter the Colorforms wall calendar. Yes, I said Colorforms, as in the plastic that sticks like magic. Down through the years, Colorforms have been considered seriously small-kid stuff, and in a strange way they're also a secret addiction for many alleged adults like myself. Just because I'm making monthly mortgage payments doesn't exclude me from deriving any pleasure from sticking bits of printed vinyl to other bits of printed vinyl, now does it? And here's something else that many casual collectors have overlooked: Colorforms have a solid retrogaming pedigree.
It's a fun little exercise, and there's even a space atop the calendar that serves no purpose other than to let you arrange some Colorforms however you like. Sorta like that time a large red ball dropped on Mr. Spock's head and he said "@#$%*!" (just try finding that in the captain's log). Geeky? Absolutely. Childish? Hell yeah. But if all this talk of video games - and the perfect space to play them in - doesn't bring out the child in you, then maybe we're taking it all way, way too seriously. If you have some valuable real estate set aside for your game room, it should reflect your tastes and interests. It's your space - by all means, invade it and make it your own! |
||||||
A new Invading Spaces can be found here quarterly!
For "back issues" of this column, click HERE.
You can also read more of Earl Green's work at Phosphor Dot Fossils HERE.
 If you're like me, you've
probably got a healthy collection of yesterday's consoles. But if you're like
me in any other respects, you grew up in yesterday's arcades. We're not talking
about the Pizza Time Theater iteration of the arcade. We're talking about the
dimly-lit, possibly even shady and dangerous arcades of yesteryear. The arcades
where the wall was black, the support columns holding the ceiling up were
mirrored, and there probably wasn't a single white light bulb to be found on the
premises. The arcades where no pizza was ever served, and where the brightest
light sources in the room were either the pulsating monitors of the games
themselves, or the backlit slabs of plexiglas identifying each machine. Later,
paranoid parents fussed over the talk-show-fueled fears that video arcades were
dens of iniquity, and Nolan Bushnell emerged from the sale of Atari with the
answer that would keep the arcade business around for a few more years than it
might have otherwise. The Pizza Time Theater influence rippled through the rest
of the industry when it became apparent that Bushnell had struck gold again.
Day-glo colors and bright lighting were the norm - at least for those arcades
whose operators wanted parents to leave their kids there with five dollar
bills. The darkened, atmospheric arcades of yeseterday were gone. And all
these years later, I'm still trying to bring that feeling back.
If you're like me, you've
probably got a healthy collection of yesterday's consoles. But if you're like
me in any other respects, you grew up in yesterday's arcades. We're not talking
about the Pizza Time Theater iteration of the arcade. We're talking about the
dimly-lit, possibly even shady and dangerous arcades of yesteryear. The arcades
where the wall was black, the support columns holding the ceiling up were
mirrored, and there probably wasn't a single white light bulb to be found on the
premises. The arcades where no pizza was ever served, and where the brightest
light sources in the room were either the pulsating monitors of the games
themselves, or the backlit slabs of plexiglas identifying each machine. Later,
paranoid parents fussed over the talk-show-fueled fears that video arcades were
dens of iniquity, and Nolan Bushnell emerged from the sale of Atari with the
answer that would keep the arcade business around for a few more years than it
might have otherwise. The Pizza Time Theater influence rippled through the rest
of the industry when it became apparent that Bushnell had struck gold again.
Day-glo colors and bright lighting were the norm - at least for those arcades
whose operators wanted parents to leave their kids there with five dollar
bills. The darkened, atmospheric arcades of yeseterday were gone. And all
these years later, I'm still trying to bring that feeling back.


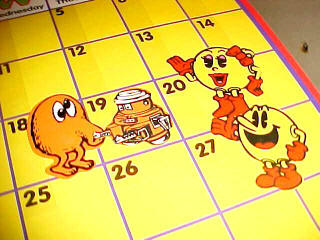 While the Colorforms wall
calendar is a relatively new item that comes with its own selection of stick-on
dates, weather symbols and other fun stuff, it's also naturally compatible with
every other Colorforms set you can imagine. To make the retrogaming wall
calendar a reality, I tracked down the Q*Bert and Pac-Man Colorforms sets
on eBay, both of them coming in for less than $10. (If anything, I blew more
money out the door on sets that reflected my other interests, such as Star Trek
and the obscure 1979 Disney flick The Black Hole.) Now Pac-Man and Ms.
Pac-Man sit on dates corresponding to my payday or my wife's payday, and random
other occasions are marked by the appearances of Q*Bert, Ugg, Slick, Sam, those
pesky ghost monsters, or even the occasional stray robot from The Black Hole.
Lucky for me, the two sets of videogame-related Colorforms I've tracked down are
tied in to a couple of my all-time favorite games. The downside of that is that
these are the only such Colorforms sets I've found. You'd think Nintendo would
be all over this, and that Mario, Yoshi and Link would be immortalized as
Colorforms, but alas, we're stuck with Paper Mario, not Vinyl Mario. But just
about every other pop culture icon you can think of has been commemorated in
this form: Michael Jackson, Pee-Wee Herman, Gremlins, Planet Of The Apes,
The Six Million Dollar Man, Strawberry Shortcake...
While the Colorforms wall
calendar is a relatively new item that comes with its own selection of stick-on
dates, weather symbols and other fun stuff, it's also naturally compatible with
every other Colorforms set you can imagine. To make the retrogaming wall
calendar a reality, I tracked down the Q*Bert and Pac-Man Colorforms sets
on eBay, both of them coming in for less than $10. (If anything, I blew more
money out the door on sets that reflected my other interests, such as Star Trek
and the obscure 1979 Disney flick The Black Hole.) Now Pac-Man and Ms.
Pac-Man sit on dates corresponding to my payday or my wife's payday, and random
other occasions are marked by the appearances of Q*Bert, Ugg, Slick, Sam, those
pesky ghost monsters, or even the occasional stray robot from The Black Hole.
Lucky for me, the two sets of videogame-related Colorforms I've tracked down are
tied in to a couple of my all-time favorite games. The downside of that is that
these are the only such Colorforms sets I've found. You'd think Nintendo would
be all over this, and that Mario, Yoshi and Link would be immortalized as
Colorforms, but alas, we're stuck with Paper Mario, not Vinyl Mario. But just
about every other pop culture icon you can think of has been commemorated in
this form: Michael Jackson, Pee-Wee Herman, Gremlins, Planet Of The Apes,
The Six Million Dollar Man, Strawberry Shortcake...